nodig/needed ;
foam sheet , super glue , 2 ringen, schaar ( scissor ),lat ( ruler )
tekent het patroon zoals hier op het foto ( draw the patern like here on the pic )
na het snijden van al je stukken
niet vergeten de lijnen te tekenen !!!
this is wat you need after cutting al pieces
don't forget to draw the lines !!!!
snij nu lichtjes het mag niet door zijn op de lijnen !!!! op het grootste stuk (7 op 2,5 cm)
cut very carefully on the lines ..like on the pic !!!on the biggest piece ( 7 x2,5 cm)
this is the bottom and the 2 sides of the bag
en lijm deze met super glue tegen de zijkanten !!!!!
nu neem je het stuk van 2 op 3 cm
take now the piece : 2 x3 cm
glue it now with super glue on the side not between !!!!!
neem nu het laatste stuk ( 5 op 3 cm) en snij voorzichtig zoals daar juist ... dit is de rug en het deksel
take now the last piece ( 5 x 3 cm en like you did before cut carrefully ... this one is the back and lid
nu ga je misschien zien dat het deksel wat te groot is snij het teveel ervan
now it's possible that you see that the lid to big is , just cut the excess
nu neem je het stukje van 4 mm op 8 cm en lijm je deze rond het deksel
take now the piece 4 mm x 8 cm and glue it on the lid
neem nu de stukje : 3 mm op 8 cm en 2 stukjes van 3 mm op 1 cm dit is voor het handvat
take now the piece : 3 mm x 8 cm and 2 pieces : 3 mm x 1 cm this is for the handle
lijm het zoals hier afgebeeld is
glue it like on the pic
als laatste versier je je zak / decorate now your bag ....
nu vullen met ijsblokjes en drank...
fill it now with ice cubes and drinks ...
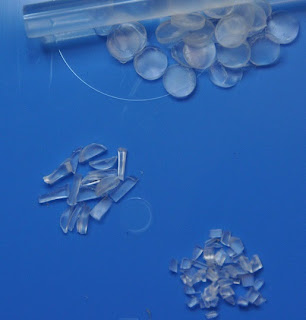
hoe ik mijn ijsblokes heb gedaan ... heel simpel neem een warme lijm stick...
how i did the ice cubes... easy take a hot glue gun stick ...
and snijden ...
and cut ....
ik hoop dat je van deze workshopje heb genoten ....
i hope you have enjoy this little tutorial ....
Corine
please if you share this put the link of my blog ... this tuto may not be published without my permission


Corine, Erg leuk workshopje, ga ik echt ook nog eens maken!
BeantwoordenVerwijderenGroetjes, Thea (Bob)
Grazie per questo bel tutorial.
BeantwoordenVerwijderenSaluti, Faby
very cute!!!
BeantwoordenVerwijderenHoi Corine,
BeantwoordenVerwijderenveele dank voor de leuke workshoppje.
liefs
Sonja
Great tutorial thank you for sharing.
BeantwoordenVerwijderenHugs Maria
¡¡que maravilla!! un tutorial fabuloso y con mucha imaginación.
BeantwoordenVerwijderenGracias por compartirlo.
Besos